If you’ve ever searched code with regular expressions, you may have struggled with matching multiple lines, nested structures, or ignoring comments.
Let me introduce ast-grep VSCode, a new extension leveraging the power of structural search and replace (SSR) to help you perform more precise and efficient search and replace.
The Limitations of Textual Search and Replace
Suppose you want to refactor your JavaScript code to replace the lodash_.filter function with the native Array.prototype.filtermethod. A simple text search and replace might look like this:
This might work for some cases, but it has several limitations:
It can only match single-line expressions. If your code spans multiple lines, you’ll miss some matches or get incorrect replacements.
It can’t handle nested structures like parentheses, brackets, or braces. If your code has complex expressions, you’ll get incorrect matches or replacements.
It can’t ignore comments or other irrelevant parts of the code. If your code has comments that contain the search pattern, you’ll get unwanted matches or replacements.
It requires you to use match groups or named capture groups to preserve the arguments of the function. This can be tedious and error-prone, especially with many arguments or nested functions.
Structural Search and Replace Comes to the Rescue
Can we make our search algorithm smarter, understand our code better, and be easier to use? Yes! Structural search and replace (SSR) comes to the rescue!
Structural search and replace (SSR) is a technique that allows you to find and modify code patterns based on their syntax and semantics, not just their text. Instead of treating code as plain text, SSR treats code as a collection of nodes with types, properties, and relationships.
ast-grep is a command-line tool that implements SSR. The query for the lodash example above is quite simple.
The pattern illustrates the basic usage of ast-grep. $ARR and $FUNC are meta-variables. Meta-variables are like the dot . in regular expressions, except they match AST nodes instead of characters. You can also use captured meta-variables in the rewrite pattern.
Other than the meta-variables, I hope the pattern and rewrite are self-explanatory.
This query has several advantages over the text search and replace:
It can match expressions across multiple lines, as long as they are syntactically valid.
It can handle nested structures like parentheses, brackets, or braces, as they are part of the AST.
It can ignore comments or other irrelevant parts of the code, as they are not part of the AST.
It does not require match groups or named capture groups, as the meta-variables are accessed by their names in the search pattern.
Unique Features of ast-grep
ast-grep uses the tree-sitter library, a fast and robust parser for many programming languages. ast-grep allows you to write queries using a simple pattern syntax that resembles code and apply them to files or directories of code. Some of the unique features of ast-grep are:
It supports many languages, including JavaScript, TypeScript, Python, Ruby, Java, C#, Go, Rust, and more. You can also add support for new languages by registering tree-sitter grammars in the configuration.
It is written in Rust, which makes it very fast and memory-efficient. It can process large codebases in a matter of seconds.
It has a rich set of options and flags, such as dry run, interactive mode, color output, and more. You can customize your SSR experience to suit your needs and preferences.
But, ast-grep until now only has a command-line interface. Can we have its power right near our hands instead of switching between terminals and editors?
ast-grep VSCode: Bridging the CLI and the Editor
ast-grep VSCode is a new extension that integrates ast-grep with Visual Studio Code, one of the most popular code editors. With ast-grep VSCode, you can use SSR within your editor, without leaving your workflow.
Structural Search, Replace, and More
Some features of ast-grep VSCode include:
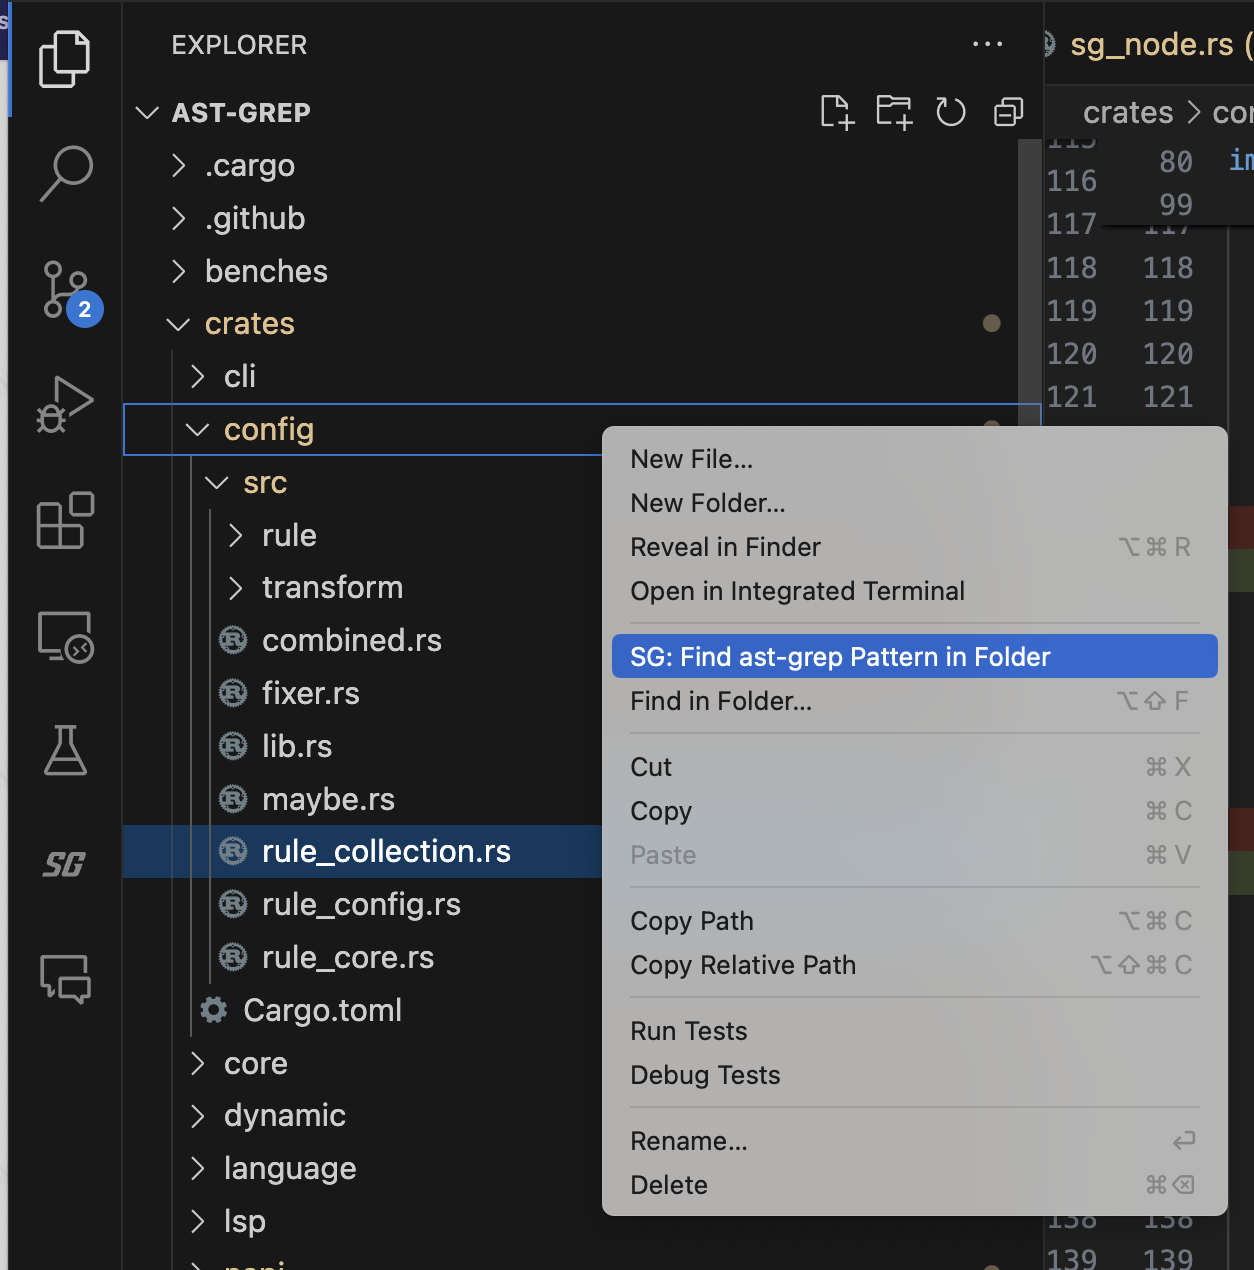
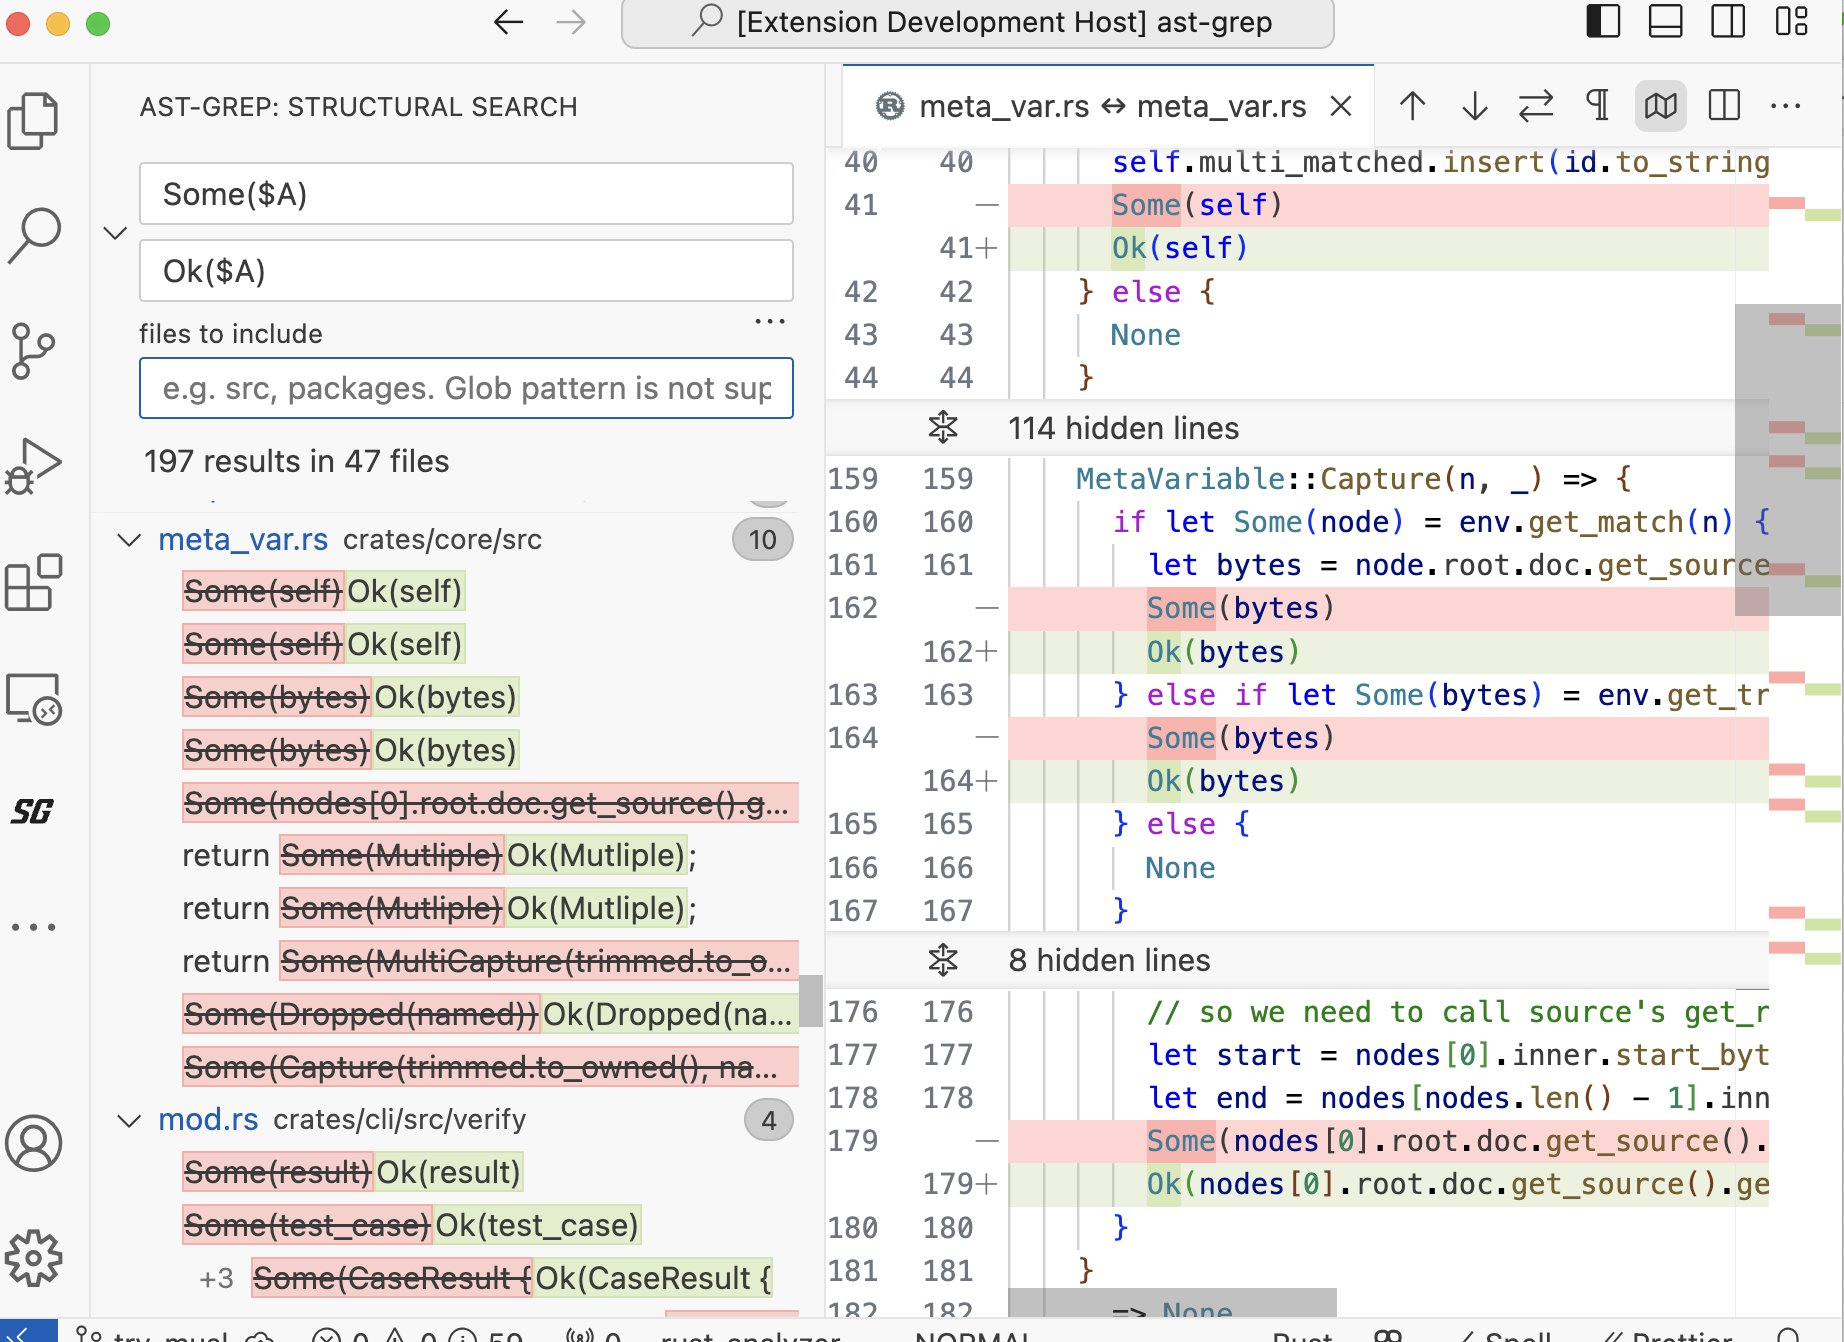
It provides a user interface for writing and executing SSR queries, and you can see the results of your queries in a sidebar, with previews and diffs.
It also supports linting and code fix. You can set up an ast-grep project and write custom rules tailored to your needs.
It feels like a native VSCode feature, with seamless integration and consistent design.
Feature
Screenshot
Search Pattern
Search In Folder
Replace Preview
Commit Replace
Code Linting
Comparing with Other SSR Tools
There are other SSR tools and extensions available. However, I believe ast-grep VSCode is one of the best SSR extensions for VSCode because:
It has good performance, backed by a multi-threaded CLI written in a native language.
It supports multiple languages, leveraging the tree-sitter grammars widely used and maintained by the community.
It has a user-friendly and intuitive interface that feels like a VSCode built-in feature. See it in action.
Finally, I want to highlight some React techniques used in ast-grep VSCode that make it fast and responsive:
useSyncExternalStore was used to manage streaming results from ast-grep CLI. This hook allows components to subscribe to an external mutable source of data and update the rendering accordingly. This way, the extension can show the results as soon as they are available.
useDeferredValue deferred rendering the result list. This hook can avoid blocking user input and improve the perceived performance of the UI by delaying the update of a derived state until the next concurrent render.
The extension carefully used plenty of memo and CSS tricks to reduce the JavaScript workload.
Conclusion
I hope this article helps you understand the benefits of SSR and the features of ast-grep VSCode. If you are interested in trying it out, you can install it from the VSCode Marketplace. ast-grep VSCode is still in development and has a lot of room for improvement. I would love to hear your feedback and suggestions, so feel free to open an issue or a pull request on GitHub. I also want to thank SoonIter, Steven Love, Nyakku Shigure, and ssr.nvim for their contribution and inspiration!
Happy grepping!
Celebrating 6000 Stars: ast-grep’s Journey of Innovation
We are thrilled to announce that ast-grep, the powerful code search tool, has reached a stellar milestone of 6000 stars on GitHub! This is a testament to the community’s trust in our tool and the continuous improvements we’ve made. Let’s dive into the latest features and enhancements that make ast-grep the go-to tool for developers worldwide.
Feature Enhancements
Rewriters Addition: We’ve added support for rewriters #855, enabling complex code transformations and refactoring with ease. The new feature unlocks a novel functional programming like code rewrite scheme: find and patch. Check out our previous blog post for more details.
Error/Warning Suppression Support: The new feature #446 allows users to suppress specific errors or warnings, giving you more control over your code analysis. ast-grep also respects suppression comments in Language Server Protocol (LSP), making it easier to manage warnings and errors in your codebase.
Enhanced Rule Constraints: The ast-grep rule constraints previously only accepts pattern, kind and regex. Now it accepts a full rule #855, providing more flexibility than ever before.
VSCode extension
The ast-grep VSCode extension is an official VSCode integration for this CLI tool. It unleashes the power of structural search and replace (SSR) directly into your editor.
Notable Features
Search: Find code patterns with syntax tree.
Replace: Refactor code with pattern.
Diagnose: Identify issues via ast-grep rule.
Performance Boost
Parallel Thread Output Fix: A significant fix #be230ca ensures parallel thread outputs are now guaranteed, boosting overall performance.
Architectural Evolution
Tree-Sitter Version Bump: We’ve upgraded to the latest tree-sitter version, enhancing parsing accuracy and speed. In future releases, we plan to leverage tree-sitter’s new Web Assembly grammar to support even more languages.
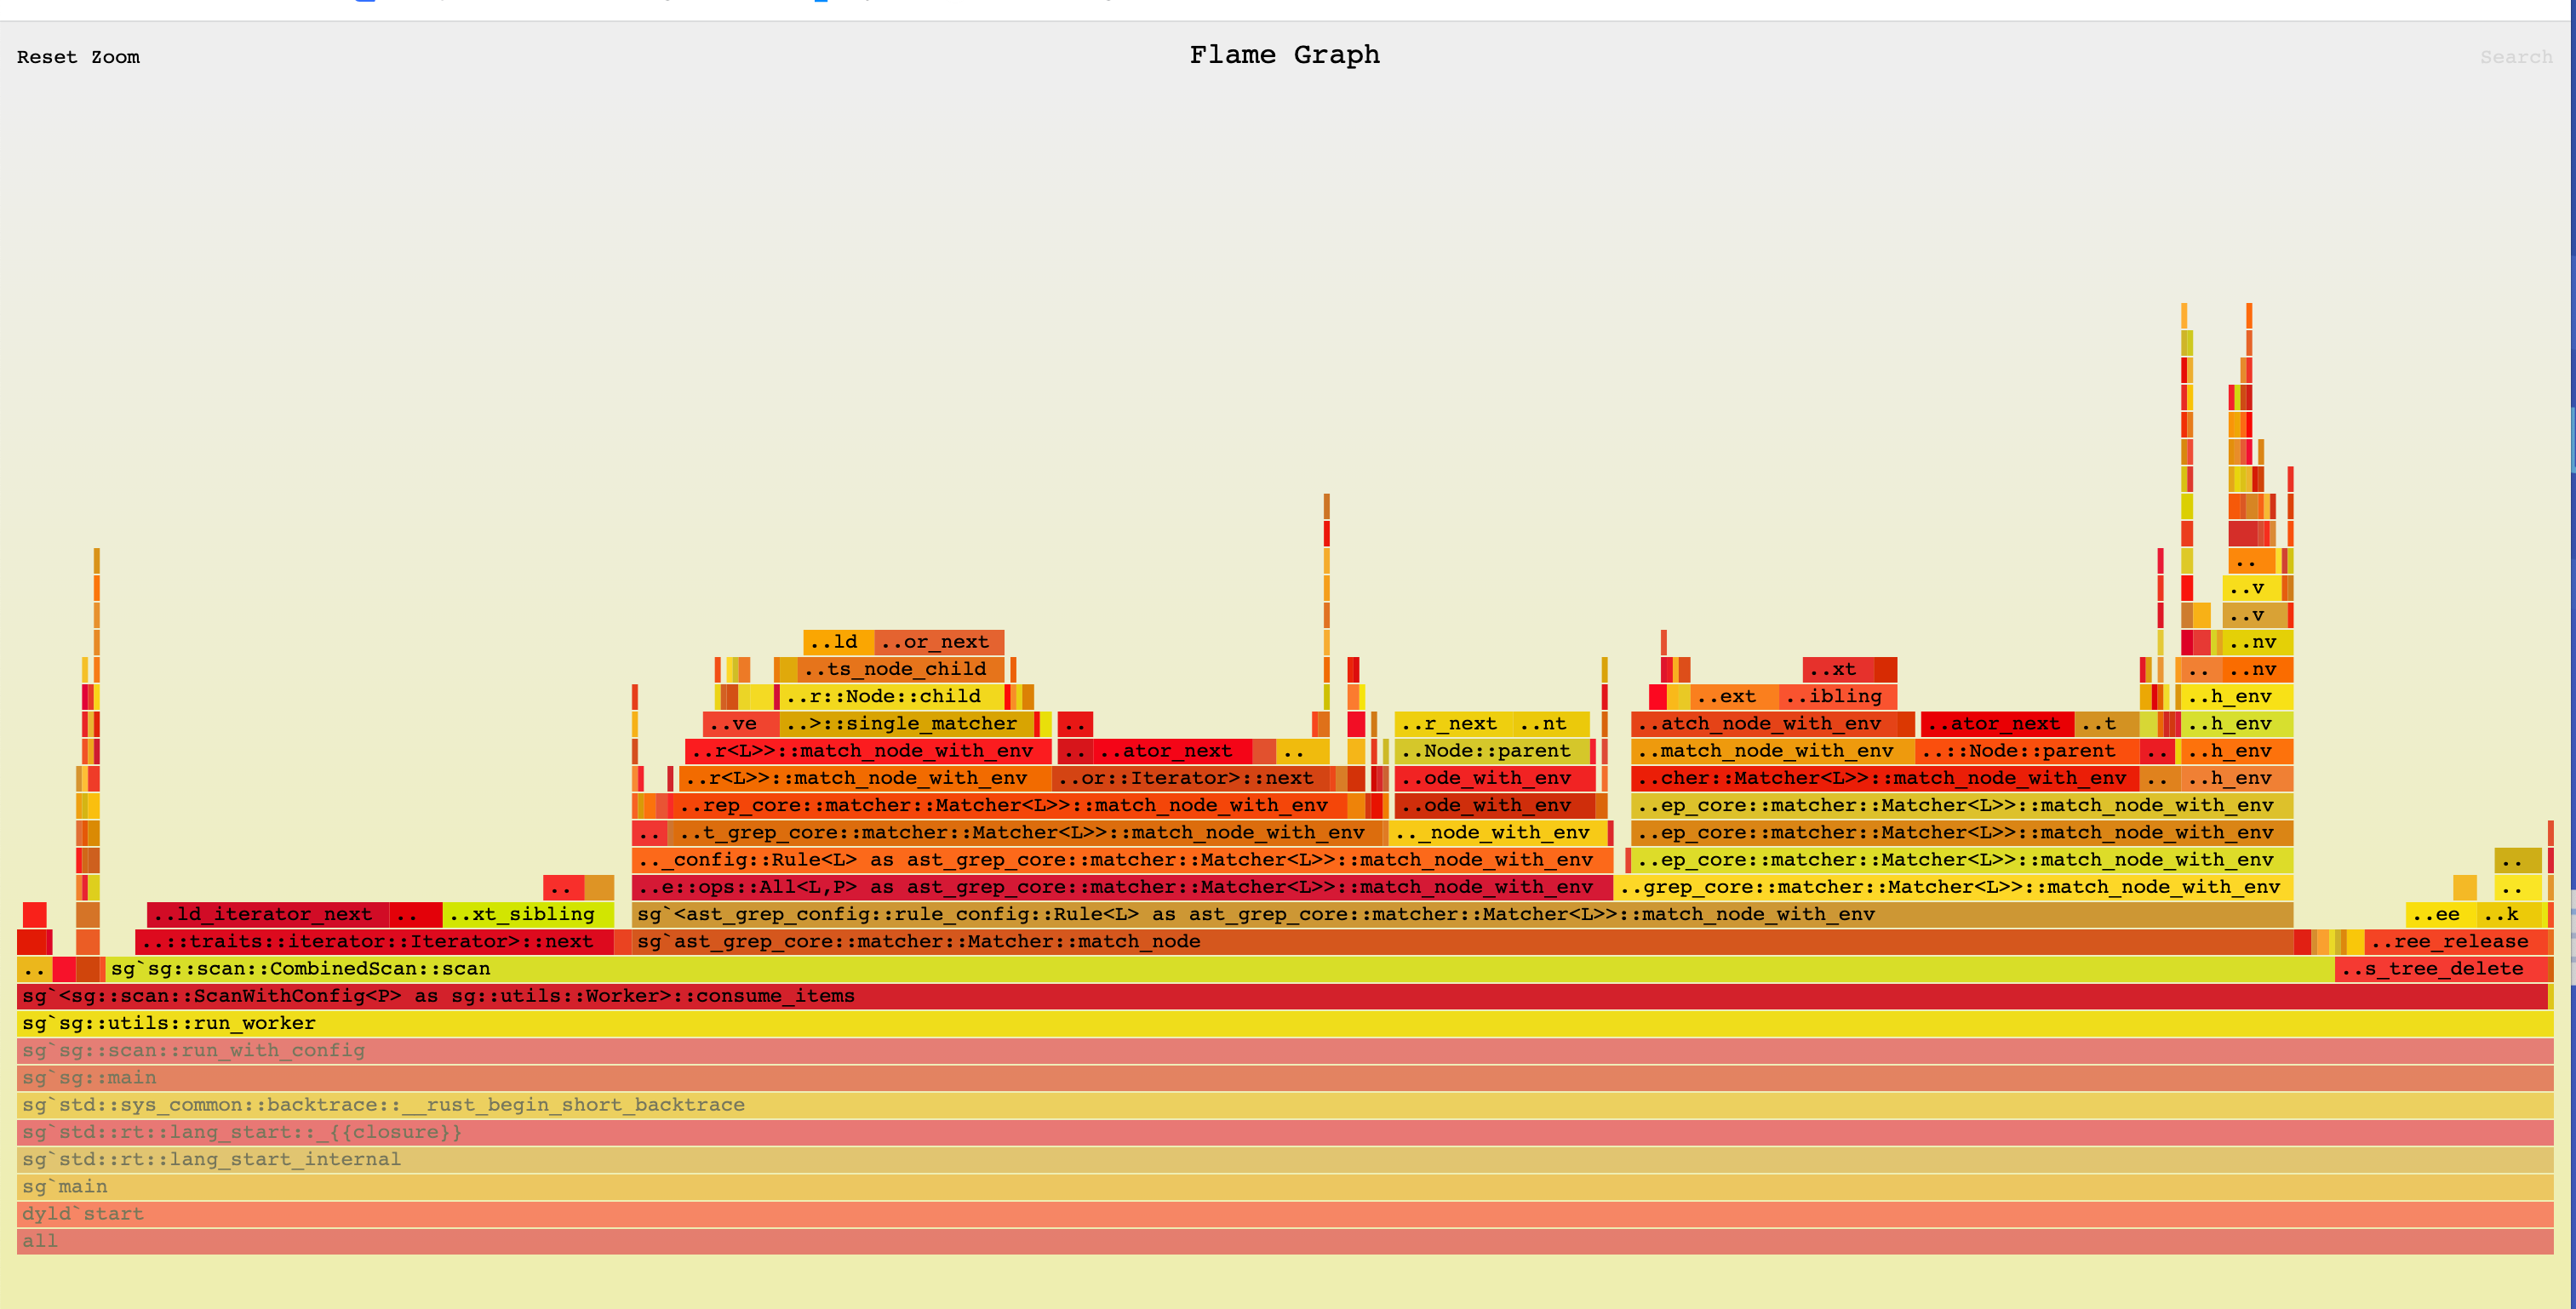
Scan and Diff Merge: The refactor combines CombinedScan::scan and CombinedScan::diff for a more streamlined process.
Input Stream Optimization: Now, ast-grep avoids unnecessary input stream usage when updating all rules #943, making it possible to use sg scan --update-all.
Usability Improvements
Error Messaging for Rule File Parsing: The VSCode extension now provides clearer error messages #968 when rule file parsing fails, making troubleshooting a breeze.
Better Pattern Parsing: Improved expando character replacement #883 to make pattern .
More Permissive Patterns: Patterns have become more permissive #1087 that allows matching $METAVAR with different syntax kind.
Enhanced Error Reporting
We’ve introduced a suite of features to improve error reporting, making it easier to debug and refine your code:
Report undefined meta-variables, errors in fixes, unused rewriters, and undefined utility rules.
Add field ID errors for relational rules and optimize test updates to avoid erroneous reports.
Shift from reporting file counts to error counts for a more meaningful insight into code quality.
Language Support Expansion
Haskell Support: Haskell enthusiasts rejoice! ast-grep now supports Haskell via tree-sitter-haskell #1128, broadening our language coverage.
NAPI Advancements
NAPI Linux x64 musl Support: Our latest feat in NAPI #c4d7902 adds support for Linux x64 musl, ensuring wider compatibility and performance.
As ast-grep continues to grow, we remain committed to providing a tool that not only meets but exceeds the expectations of our diverse user base. We thank each and every one of you for your support, contributions, and feedback that have shaped ast-grep into what it is today. Here’s to many more milestones ahead!
追求人物与历史的对应,观众大体看不懂,但折射剧中“活着,活下去”的概念,则是亘古不变的话题。 在柳巷当游娼是活着,在花街当倌人是活着。正如在洗脚店当技师是活着,,在商 K 当公主是活着。风俗行业是客观存在的,从古至今都客观存在过也依然存在着。即使做不到对它进行批判,至少也要思考为什么它存在,行业人员是怎么活着的。
Welcome to the web framework restaurant, where we serve you a delicious dish of web frameworks with a side of humor and a pinch of salt.
I’m your waiter, Herrington, and I’ll be serving you a mostly wrong comparisons of the web. Don’t worry, I won’t spit in your food, but I might twist some facts for your entertainment. 😈
I hope you enjoy your meal.
The Analogy Ingredients
Before we dive into our main course, let’s have a taste of our analogy ingredients.
Our first ingredient is HTML, the basic structure of a web page. It defines the elements and layout of a web page, such as headings, paragraphs, tables, and images. HTML is static, plain and bland, meaning it does not change or interact with the user. It’s like bread, the staple food of many cuisines. You can eat it by itself, but it’s not very exciting.
The second ingredient is JavaScript, which adds logic and functionality to a web page. It’s like meat, the star of many dishes. JavaScript can manipulate HTML elements, handle user events, and communicate with servers. JavaScript is our Meat. It adds flavor and protein to your web page, making it more dynamic and interactive.
Together, they form the foundation of many web framework, just like bread and meat form the foundation of many dishes.
Cooking can have many variations, depending on the type, quality and quantity of bread and meat, as well as the addition of other ingredients, such as cheese, lettuce, tomato, sauce, etc.
Similarly, a web framework can have many variations, depending on the type, quality and quantity of HTML and JavaScript, as well as the addition of other features.
In this blog post, we will explore some of the most popular and influential web framework approaches, and compare them to some of the most popular foods.
Are you ready to sink your teeth into this tasty topic? Then let’s begin!
Web Frameworks Review Menu
HTML only, Dry and Crusty Bread 🍞
In the old days, we only had HTML4.0 compatible webpages. You can see layout using <table>s, styling using <font>s and grabbing attention using maraquees. Every webpage back then was just static HTML. It was like dry and crusty bread. Nothing fancy, but it worked to present CERN like documents on web. How boring, right?
jQuery, Slapping a Slice of Ham on Bread 🍖
Then, JavaScript library like jQuery came along. They were the spiced ham of web development, adding flavor and spice to virtually every page. JS libraries simplify the manipulation of HTML elements, the handling of user events, and the communication with servers. The $ dollar from jQuery king really shined (probably is still shining). It is like slapping a slice of ham on bread. Suddenly, your web pages became more tasty and satisfying, with a touch of meaty goodness. But usually you are still using HTML as the main structure and data-source of your web page. You can add a lot of JavaScript to your web page and make it as dynamic as you want, but the boundary between HTML and JavaScript is still clear. Slapping a ton of hams on your bread still makes it a bread.
Component Frameworks, Barbecue Time 🔥
Manipulating DOM alone is not enough for modern web app. We need a way to systematically manage the state of our web app, and we need to do it in a more structured way.
Then, frameworks based on components came along, e.g. Angular, React, Vue and etc. They are all different types of meat. Angular is like beef, it’s rich and heavy, but it requires a lot of preparation and seasoning. React is like chicken, it’s light and versatile, but it needs some extra ingredients to make it tasty. Vue is like pork, it’s sweet and easy, but it may not be everyone’s cup of tea. They are all client-side only frameworks. They run on the browser, and they are all JavaScript frameworks.
Running these JavaScript to create DOM in browser is like cooking barbecue at your backyard home.
You can add as much meat and seasoning as you want, but your cooking time may be infinitely extended. Similarly, adding a lot of interactive components or dynamic contents may hurt your page loading performance.
SSR, Still Barbecue, but with Bread Stick 🥖
Hosting a barbecue party at your home (browser) is fun! But waiting for a slow grill, say a five-year-old mobile phone’s CPU, is frustrating. Hangry guests are waiting for their webpage food to be ready, but they only see smoke and fire (loading screen).
That’s where SSR, or Server Side Rendering, comes in handy. SSR is not a framework, but a technique that lets you cook some of your food in advance at a professional kitchen, the server. SSR runs your component code on the server and generates HTML pages that are ready to consume. The HTML pages are then sent to your users as static HTML bread stick appetizer. Your guests can munch on them while your grill is still working on the rest of the food.
But there’s more than breadstick! SSR also sends you the component code, so you can run it on your local grill and make your food more juicy and meaty. This process is called hydration, which allows you to add interactivity and functionality to your static HTML, such as handling user events and communicating with servers. This is serving JavaScript meat juice to make dry HTML breadstick moist (dynamic).
More often than not will you see hydration mismatch. Alas, that means the DOM generated on client side is not the same as HTML generated by server, usually caused by different rendering content or violation of HTML rules. Serving SSR needs your meticulous cooking and plating to perfectly plate your patty on your bread.
SSR is like serving pre-made breadsticks to your guests while you are still making barbecue. It improves the performance and user experience of your web page, by reducing the loading time and increasing the perceived speed. Yet, it is not the silver bullet.
Island Architecture: The Burger 🍔
Let’s face it: running the same JavaScript on both server and client is like cooking the same meat twice. It’s inefficient, wasteful, and potentially harmful. We don’t want to overcook our meat.
But not all components need to be cooked. Some of them are fine as they are since they are bread. Can we just keep them as pure HTML, and only cook the ones that need to be juicy and tender, like the meat?
That’s exactly the idea behind the “Islands” architecture, which is mostly promoted by Astro. These frameworks allow you to create web pages that are a mix of static and dynamic content, like a burger.
The “Islands” architecture works like this:
It renders HTML pages on the server like pre-baking the bun. (no pun intended)
It injects placeholders or slots around highly dynamic regions, like cutting holes in the bread for the meat and other toppings.
It sends static HTML pages to the client, like delivering the bread to your home.
It hydrates the placeholders or slots on the client into small self-contained widgets, like adding the meat and other toppings to the bread.
The result is a web page that is a burger: a dynamic JavaScript patty sandwiched between surrounding static HTML breads. It’s fast, tasty, and satisfying.
Don’t believe me? Just look at Astro’s official site. They have a burger in their chart. It’s exactly the same!
Qwik: The New Pizza 🍕
Besides partial hydration techniques like islands-architecture, you might also think about the possibility of incremental hydration. You may want to try Qwik, a new framework that promises instant-on interactivity, regardless of size or complexity.
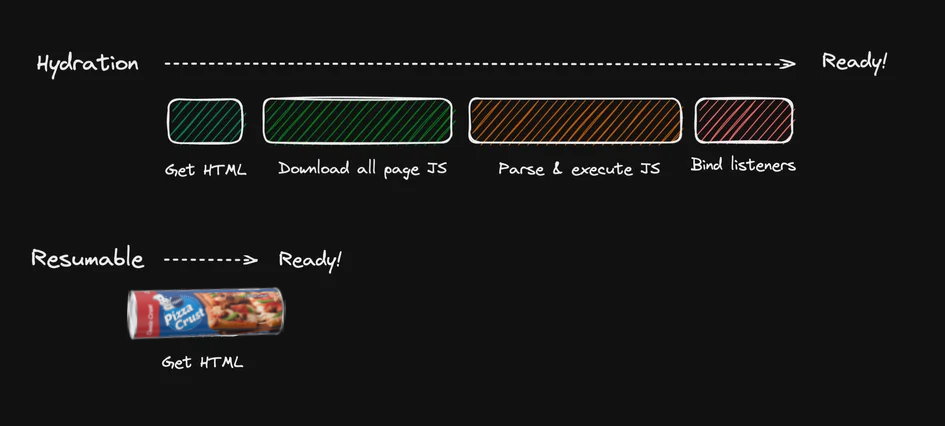
Qwik is different from other frameworks that use the Islands architecture, which selectively chooses components to hydrate. Qwik takes a more radical approach: it chops your app into tiny pieces and hydrates them only when they need to be interactive. Qwik calls this resumability, which means your app can resume from any state without reloading or re-rendering.
Qwik works like this:
It renders static HTML pages on the server, like making pizza dough.
It leaves a special html attribute to mark the dynamic components, like sprinkling cheese on the dough.
It sends static HTML pages to the client, like delivering the pizza to your home.
It hydrates the dynamic components on the client according to the user’s interaction, like adding toppings to the pizza.
Qwik is like pizza: you can eat it as soon as it arrives, or you can customize it to your liking. You can add pepperoni, bacon, sausage, or whatever you want, slice by slice, until you get the full interactive pizza. It’s delicious, satisfying, and quick. (pun intended)
HTMX: The Renaissance of Ham Sandwich 🥪
Do you remember the good old days, when web pages were simple and fast, and JavaScript was just a garnish? Well, HTMX wants to bring back those days, with a modern twist.
HTMX is a framework that lets you create web pages that are mostly HTML, with a little bit of JavaScript.
HTMX creates web pages by rendering HTML pages on the server, like slicing bread, and sending them to the client, like putting bread on a plate.
Then, it adds interactivity by running minimal JavaScript on the client when user interaction happens, like adding ham to the bread.
Finally, it updates the web page by fetching new HTML pages from the server and appending or swapping them to the DOM, like making a sandwich.
HTMX is like a ham sandwich: it’s simple, tasty, and satisfying, with generous sprinkles of memes. It’s also fast, because it doesn’t load unnecessary JavaScript or re-render the whole page. HTMX is the ham sandwich of the web, and it will make you nostalgic.
HTMX is not the only framework that does this. Turbo or Turbolinks are also frameworks that use the same technique. They are like different kinds of ham, or different kinds of bread.
React Server Components: The Ultimate JSX Lasagna 🍝
You might have heard about ReactServerComponents a lot. RSC is a relatively new feature that lets you render components on the server and stream them to the client in the form of JSX in JSON. Though the name contains React™, server component is not limited to certain frameworks. Actually, Phoenix LiveView is a framework that has used the same model before RSC ever existed. Streamlit is also a nice example.
React Server Components are not a single type of components but a programming model. RSC has two kinds of components: server components and client components.
Server components are rendered on the server into static JSX, in a JSON-like structure, and are streamed to the client, like cooking lasagna noodles on the stove and sending them to the oven.
Client components are sent to the client as JavaScript files, and they generate JSX on the client, like adding raw meat sauce onto lasagna and cooking them in the oven.
Server and Client components can be interleaved with each other, like layering noodles, sauce, cheese, and meat in the lasagna.
React Server Components are unique because they can mix static JSX and dynamic JSX all together, layer by layer. Unlike Astro or Qwik, which have strict rules about how to combine static and dynamic content, React Server Components are more flexible and versatile. You can have pepperoni over pizza, but you can’t have pizza over pepperoni. That is, a dynamic component in Qwik can’t have another pure static component inside it. Similarly, you can’t have a burger bun inside the beef patty in Astro burger.
But you can have anything you want in React Server Components. You can have meat, bread, meat, bread, meat, bread, all the way down, freely mixing static and dynamic content. React Server Component model is like JSX lasagna, a delicious dish that can have any ingredients you like, as long as they fit in the layers. But the power does not come for free. RSC has a very steep learning curve and many features that cannot be covered in one blog post. You can read tutorials, introductions or even quizzes. Oh, don’t daunt people too much by going down the rabbit hole too deep. This article is just a parody for fun. Not for educational purpose.
Indeed, lasagna is a delicious and sophisticated dish, and, accordingly, has a complicated recipe that includes more steps and instructions.
That’s it for our web development history restaurant. I hope you enjoyed your meal and learned something new. Before you leave, here are some takeaways and leftovers for you to digest.
Where do your Data or State Get Computed?
Our analogy is about the boundary between static and dynamic content. This is essentially asking where your data/state is cooked. If the data is cooked on the server and transformed into a static view, it will not change on the client side. It’s like buying an off-shelf bread from a grocery store and eating it at home. You can’t change anything in the ingredient list. You can only enjoy it as it is.
On the other hand, if the data is cooked on the client side, it can respond to user interaction and change the view, so it is dynamic content. It’s like cooking meat at home and eating it fresh. Every interaction can be responded by JavaScript DOM nearly instantly without waiting. But instantiating JavaScript costs time, like grilling meat at home.
What is the boundary between static and dynamic content?
We don’t have a unanimous approach towards the boundary between static and dynamic content. So we have so many different web frameworks, each with their own flavor and texture.
It can be totally separated. Static HTML or CSR falls into this category. It’s like having bread and meat separately. You can eat them by themselves.
SSR can mix static and dynamic content by first running JS on the server and rehydrating it on the client side.
And on top of SSR, we can selectively and incrementally hydrate the dynamic content.
We can have the “Islands” architecture, which is SSR with selective hydration. It’s like making html buns on the server, but leaving some spaces for the client to add their JavaScript beef patty.
Or we can have incremental hydration, which is Qwik’s resumability. It’s like making a pizza crust on the server, but letting the client add their own toppings, slice by slice.
Finally, we have RSC, which is mixing static and dynamic content all together, layer by layer. We cook pasta on the server, but let the client add their meat sauce, layer by layer. The single mental model of React can rule all the server/client code. But you have to be a master chef to consciously cook the correct ingredients on the correct machines, either server or client.
Hi all! Happy New Year! I am Herrington, the author of ast-grep. Today I am going to show you how I build a discord bot for ast-grep that helps people to understand the tool and help them write patterns or YAML rules.
Before we dive into the details, let me give you a brief introduction of ast-grep. It helps you to understand why I need a chatbot and what will the bot do.
ast-grep is a command-line tool that lets you search and transform code written in many programming languages using abstract syntax trees (ASTs). ASTs are data structures that capture the syntactic and semantic structure of source code. With ast-grep, you can write patterns as if you are writing ordinary code, and it will match all code that has the same syntactical structure. And if you need more power, you can use YAML, a rule system that allows you to write more sophisticated linting rules or code modifications.
Why is it hard for users to learn?
Sounds cool, right? But there’s a catch. ast-grep is a new tool, so users have no prior knowledge and are less exposed to it compared to other established tools. Understanding ASTs requires some knowledge of programming languages. ast-grep is also feature-rich, so users need some time to find the relevant documentation. Writing YAML rules requires knowledge of the rule system. People don’t know whether they should opt for patterns or YAML to complete their tasks.
And, finally, we are all hasty nowadays and have no patience to read the documentation of a tool. We want to get started quickly!
How can a discord chatbot help?
That’s why I decided to build a discord chatbot for ast-grep. A chatbot that can help users understand the basic concepts about ASTs, get people started quickly, guide them to the most relevant documentation, and even help them to write patterns or YAML rules! It’s like having a personal tutor, available 24/7!
How did I do it? Well, I used coze, a free gpt-4, no-code workflow system that lets you build chatbots for any purpose. And the best part is, I did it for free, without code!
coze has four main features like GPTs, except that it is free:
Custom prompting: you can write your own prompts to control the flow of the conversation, ask for user input, validate the input, and generate responses.
Knowledge base retrieval: you can upload text files as a knowledge base, and coze will automatically segment it and index it for retrieval. The bummer is that you can upload at most ten files. :(
Function call: you can invoke any external API from your prompts, and use the results in your responses.
Database access: you can store and retrieve data from a built-in database, and use it in your prompts and responses.
With these features, I was able to build a chatbot for ast-grep in a few hours. Here’s how I did it:
Curating the Knowledge Base
To build the knowledge base, I took a simple approach. I concatenated all the markdown documentation from ast-grep’s official website! And voila, coze did the segmentation for me. It was like having a personal librarian organizing my tech library!
Building the Routing Prompt
The next step was to build a workflow to instruct GPT to write a pattern or a YAML rule for the users.
However, adding all the details about patterns and YAML rules to one single prompt is too much for GPT4 to learn and handle.
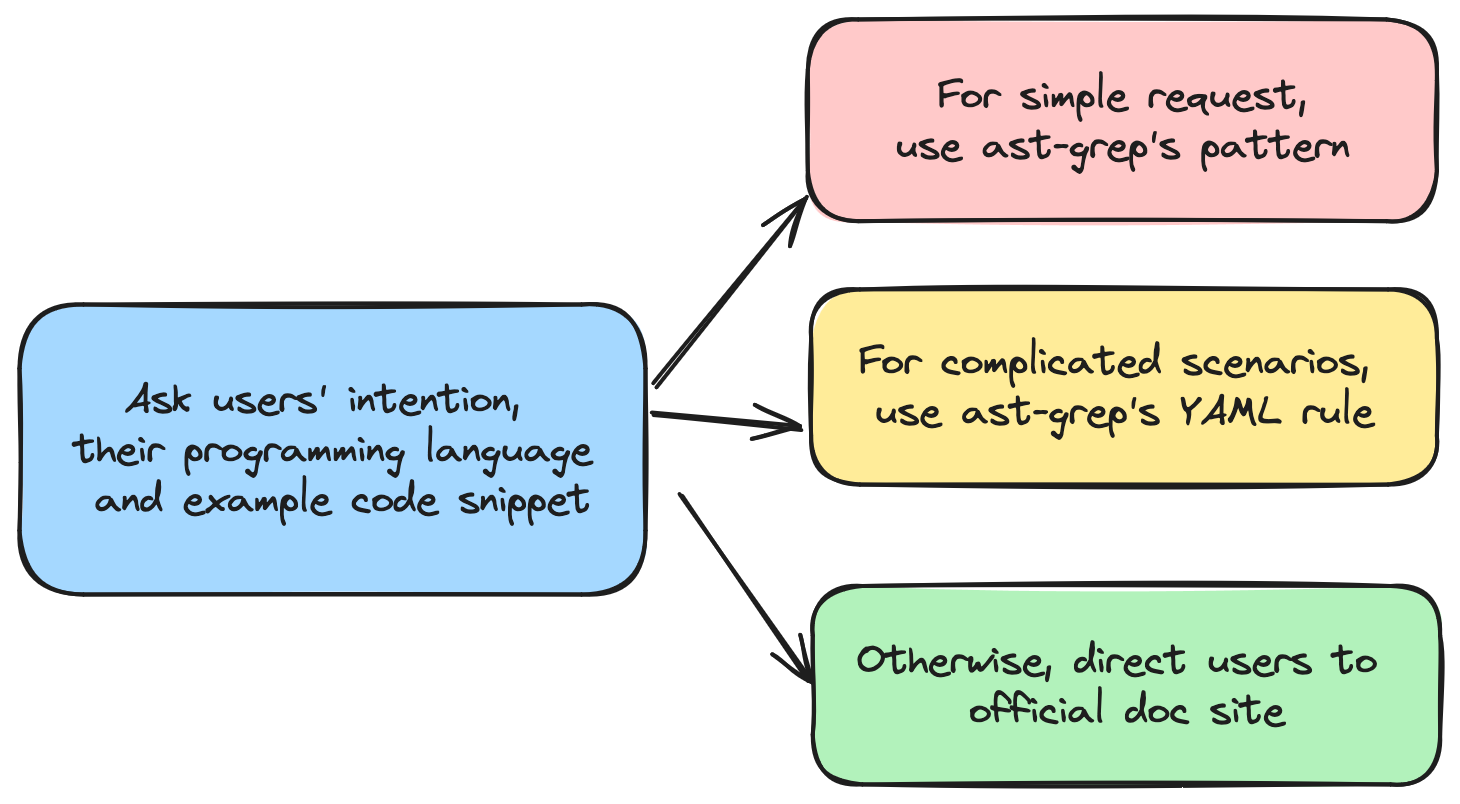
So I used a workflow to break this task down into smaller tasks and use a routing prompt to decide whether the task can be done with a pattern or a YAML rule.
The workflow looks like this:
And the routing prompt is something like
1 2 3 4 5 6 7 8 9 10 11 12 13 14 15 16
You're an ast-grep assistant who specializes in guiding users in and about the ast-grep tool. ast-grep has three kinds of usage: using pattern, using YAML rule and using API. Your task is to identify the most proper use case. * Pattern can match simple and straightforward expression/constructs in programming language. * YAML can match complicate expressions and take the surrounding AST around the expression. * API is the most flexible and powerful tool for users to implement their own matching logic. Custom matching should use API.
# Example Q: "How can I match console.log in JavaScript" A: "pattern" Explanation: `console.log` can be searched trivially with pattern
// ... more examples omitted
Please decide which usage is the most proper for the following user question: User Quesiont {{input}}
Teach the bot to write patterns or YAML rules
The next step was to teach the bot to write patterns or YAML rules for the user. For this, I used a specific and in-context-learning approach, where I provided the bot background knowledge on rule and pattern in the prompt with examples.
1 2 3 4 5 6 7 8 9 10 11 12 13 14 15 16 17
You're an ast-grep assistant. Your task is to help user to write a patter based on users' request.

# ast-grep's pattern syntax
## Pattern Basic
// explaining the basic syntax of ast-grep pattern...
## Meta Variable
// explaining the basic syntax of ast-grep pattern...
* Example: `console.log($GREETING)` can match `console.log(123)`, but not `console.log()` nor `console.log(1, 2, 3)` because GREETING does not match one single node.

# Example
Q: "Write a pattern for console.log in JavaScript"
A: console.log($$$A)

================

Please answer user's question:
{{input}}
Create a bot avatar!
The last step was to use Bing to generate a bot avatar. The default avatar placeholder is boring and I wanted to create an attractive avatar that represents ast-grep.
So I used Bing image creator! I uploaded the ast-grep logo to Bing. I also added its description and some extra keywords to make it more interesting. Here is what I wrote:
1
Can you draw me a avatar image of the ast-grep bot, an assistant bot to answer users' question about ast-grep and write pattern/rules for them, with the element of ast-grep's logo, a yellow lightning bolt and dark blue letters SG. The bot should be cute, cartoon sketch style.
And here is the result I picked up!
Link it to discord!
To link my chatbot to discord, I followed the instructions here. It required some setup but not too hard. I created a discord bot account, granted it authorization, invited it to my server, and connected it to my coze bot. Then I tested it with some questions, and it worked like a charm!
That’s it!
And there you have it, folks! A chatbot ready to guide users through the ast-grep world.
Building this bot was a fun and enlightening experience, and I hope you found this journey equally enjoyable. Though the bot creation does not require any coding, it still requires some knowledge of the tool. And analyzing your use-cases and using the workflow strategically will greatly improve bots’ responses!
Until next time, keep exploring the magic of tech!
TL;DR: Native parsers used in JavaScript are not always faster due to extra work across languages. Avoiding these overhead and using multi-core are crucial for performance.
Rust is rapidly becoming a language of choice within the JavaScript ecosystem for its performance and safety features. However, integrating Rust into JavaScript tooling presents unique challenges, particularly when it comes to designing an efficient and portable plugin system.
“Rewriting JavaScript tooling in Rust is advantageous for speed-focused projects that do not require extensive external contributions.” - Nicholas C. Zakas, creator of ESLint
Learning Rust can be daunting due to its steep learning curve, and distributing compiled binaries across different platforms is not straightforward. A Rust based plugins necessitates either static compilation of all plugins or a carefully designed application binary interface for dynamic loading. These considerations, however, are beyond the scope of this article. Instead, we’ll concentrate on how to provide robust tooling for writing plugins in JavaScript.
A critical component of JavaScript tooling is the parsing of source code into an Abstract Syntax Tree (AST). Plugins commonly inspect and manipulate the AST to transform the source code. Therefore, it’s not sufficient to parse in Rust alone; we must also make the AST accessible to JavaScript.
This post will benchmark several popular TypeScript parsers implemented in JavaScript, Rust, and C.
Parser Choices
While there are numerous JavaScript parsers available, we focus on TypeScript parsers for this benchmark. Modern bundlers must support TypeScript out-of-the-box, and TypeScript is a superset of JavaScript. Benchmarking TypeScript is a sensible choice to emulate the real-world bundler workload.
The parsers we’re evaluating include:
Babel: The Babel parser (previously Babylon) is a JavaScript parser used in Babel compiler.
TypeScript: The official parser implementation from the TypeScript team.
Tree-sitter: An incremental parsing library that can build and update concrete syntax trees for source files, aiming to parse any programming language quickly enough for text editor use.
ast-grep: A CLI tool for code structural search, lint, and rewriting based on abstract syntax trees. We are using its napi binding here.
swc: A super-fast TypeScript/JavaScript compiler written in Rust, with a focus on performance and being a library for both Rust and JavaScript users.
oxc: The Oxidation Compiler is a suite of high-performance tools for JS/TS, claiming to have the fastest and most conformant parser written in Rust.
Native Addon Performance Characteristics
Before diving into the benchmarks, let’s first review the performance characteristics of Node-API based solutions.
Node-API Pros:
Better Compiler Optimization: Code in native languages have compact data layouts, leading to fewer CPU instructions.
No Garbage Collector Runtime Overhead: This allows for more predictable performance.
However, Node-API is not a silver bullet.
Node-API Cons:
FFI Overhead: The cost of interfacing between different programming languages.
Serde Overhead: Serialization and deserialization of Rust data structures can be costly.
Encoding Overhead: Converting JS string in utf-16 to Rust’s utf-8 string can introduce significant delays.
We need to understand the pros and cons of using native node addons in order to design an insightful benchmark.
Benchmark Design
We consider two main factors:
File Size: Different file sizes reveal distinct performance characteristics. The parsing time of an N-API based parser consists of actual parsing and cross-language overhead. While parsing time is proportional to file size, the growth of cross-language overhead depends on the parser’s implementation.
Concurrency Level: Parallel parsing is not possible in JavaScript’s single main thread. However, N-API based parsers can run in separate threads, either using libuv’s thread pool or their own threading model. That said, thread spawning also incurs overhead.
We are not considering these factors in this post.
Warmup and JIT: No significant difference observed between warmup and non-warmup runs.
GC, Memory Usage: Not evaluated in this benchmark.
Node.js CLI arguments: To make the benchmark representative, default Node.js arguments were used, although tuning could potentially improve performance.
To assess parser performance across a variety of codebases, we categorized file sizes as follows:
Single Line: A minimal TypeScript snippet, let a = 123;, to measure baseline overhead.
Small File: A concise 24-line TypeScript module, representing a common utility file.
Medium File: A typical 400-line TypeScript file, reflecting average development workloads.
Large File: The extensive 2.79MB checker.ts from the TypeScript repository, challenging parsers with a complex and sizable codebase.
Concurrency Level
For this benchmark, we simulate a realistic workload by parsing five files concurrently. This number is an arbitrary but reasonable proxy to the actual JavaScript tooling.
It’s worth noting, to seasoned Node.js developers, that this setup may influence asynchronous parsing performance. However it does not disproportionately favor Rust-based parsers. The rationale behind this is left as an exercise for the reader. :)
This post aims to provide a general overview of the benchmarking for TypeScript parsers, focusing on the performance characteristics of N-API based solutions and the trade-offs involved. Feel free to adjust the benchmark setup to better fit your workload.
Now, let’s delve into the results of TypeScript parser benchmarking!
The performance of each parser is quantified in operations per second—a metric provided by the Benny benchmarking framework. For ease of comparison, we’ve normalized the results:
The fastest parser is designated as the benchmark, set at 100% efficiency.
Other parsers are evaluated relative to this benchmark, with their performance expressed as a percentage of the benchmark’s speed.
TypeScript consistently outperforms the competition across all file sizes, being twice as fast as Babel. Native language parsers show improved performance for larger files due to the reduced relative impact of FFI overhead. Nevertheless, the performance gains are not as pronounced due to serialization and deserialization (serde) overhead, which is proportional to the input file size.
Asynchronous Parsing
In the asynchronous parsing scenario, we observe the following:
ast-grep excels when handling multiple medium to large files simultaneously, effectively utilizing multi-core capabilities. TypeScript and Tree-sitter, however, experience a decline in performance with larger files. SWC and Oxc maintain consistent performance, indicating efficient use of multi-core processing.
Parse Time Breakdown
When benchmarking a Node-API based program, it’s crucial to understand the time spent not only executing Rust code but also the Node.js glue code that binds everything together. The parsing time can be dissected into three main components:
1
time = ffi_time + parse_time + serde_time
Here’s a closer look at each term:
ffi_time (Foreign Function Interface Time): This represents the overhead associated with invoking functions across different programming languages. Typically, ffi_time is a fixed cost and remains constant regardless of the input file size.
parse_time (Parse Time): The core duration required for the parser to analyze the source code and generate an Abstract Syntax Tree (AST). parse_time scales with the size of the input, making it a variable cost in the parsing process.
serde_time (Serialization/Deserialization Time): The time needed to serialize Rust data structures into a format compatible with JavaScript, and vice versa. As with parse_time, serde_time increases as the input file size grows.
In essence, benchmarking a parser involves measuring the time for the actual parsing (parse_time) and accounting for the extra overhead from cross-language function calls (ffi_time) and data format conversion (serde_time). Understanding these elements helps us evaluate the efficiency and scalability of the parser in question.
Result Interpretation
This section offers a detailed and technical analysis of the benchmark results based on the parse time framework above. Readers seeking a high-level overview may prefer to skip ahead to the summary.
FFI Overhead
In both sync parsing and async parsing scenario, the “one line” test case, which is predominant FFI overhead with minimal parsing or serialization, shows TypeScript’s superior performance. Surprisingly, Babel, expected to excel in this one-line scenario, demonstrates its own peculiar overhead.
As file size increases, FFI overhead becomes less significant, as it’s largely size-independent. For instance, ast-grep’s relative speed is 78% for a large file compared to 72% for a single line, suggesting an approximate 6% FFI overhead in synchronous parsing.
FFI overhead is more pronounced in asynchronous parsing. ast-grep’s performance drops from 72% to 60% when comparing synchronous to asynchronous parsing of a single line. The absence of a notable difference in performance for swc/oxc may be due to their unique implementation details.
Serde Overhead Unfortunately, we failed to replicate swc/oxc’s blazing performance we witnessed in other applications. Despite minimal FFI impact in “Large file” test cases, swc and oxc underperform compared to the TypeScript compiler. This can be attributed to their reliance on calling JSON.parse on strings returned from Rust, which is, to our disappointment, still more efficient than direct data structure returns.
Tree-sitter and ast-grep avoid serde overhead by returning a tree object rather than a full AST structure. Accessing tree nodes requires invoking Rust methods from JavaScript, which distributes the cost over the reading process.
Parallel
Except tree-sitter, all native TS parsers have parallel support. Contrary to JS parsers, native parsers performance will not degrade when concurrently parsing larger files. This is thanks to the power of multiple cores. JS parsers suffer from CPU bound because they have to parse file one by one.
Perf summary for parsers
The performance of each parser is summarized in the table below, which outlines the time complexity for different operations.
In the table, constant denotes a constant time cost that does not change with input size, while proportional indicates a variable cost that grows proportionally with the input size. An N/A signifies that the cost is not applicable.
JS-based parsers operate entirely within the JavaScript environment, thus avoiding any FFI or serde overhead. Their performance is solely dependent on the parsing time, which scales with the size of the input file.
The performance of Rust-based parsers is influenced by a fixed FFI overhead and a parsing time that grows with input size. However, their serde overhead varies depending on the implementation:
For ast-grep and tree-sitter, they have a fixed serialization cost of one tree object, regardless of the input size. For swc and oxc, the serialization and deserialization costs increase linearly with the input size, impacting overall performance.
Discussion
Transform vs. Parse
While Rust-based tools are renowned for their speed in transpiling code, our benchmarks reveal a different narrative when it comes to converting code into an AST that’s usable in JavaScript. This discrepancy highlights a critical consideration for Rust tooling authors: the process of passing Rust data structures to JavaScript is a complex task that can significantly affect performance. It’s essential to optimize this data exchange to maintain the high efficiency expected from Rust tooling.
Criteria for Parser Inclusion
In our benchmark, we focused on parsers that offer a JavaScript API, which influenced our selection:
Esbuild/Biome: Not included because esbuild functions primarily as a bundler, not a standalone parser. It offers transformation and build capabilities but does not expose an AST to JavaScript. Similarly, biome is a CLI application without a JavaScript API.
Esprima: Not considered for this benchmark as it lacks TypeScript support, which is a key requirement for the modern JavaScript development ecosystem.
JS Parser Review
Babel: Babel is divided into two main packages: @babel/core and @babel/parser. It’s noteworthy that @babel/core exhibits lower performance compared to @babel/parser. This is because the additional entry and hook code that surrounds the parser in the core package. Furthermore, the parseAsync function in Babel core is not genuinely asynchronous; it’s essentially a synchronous parser method wrapped in an asynchronous function. This wrapper provides extra hooks but does not enhance performance for CPU-intensive tasks due to JavaScript’s single-threaded nature. In fact, the overhead of managing asynchronous tasks can further burden the performance of @babel/core.
TypeScript:
The parsing capabilities of TypeScript defy the common perception of the TypeScript compiler (TSC) being slow. The benchmark results suggest that the primary bottleneck for TSC is not in parsing but in the subsequent type checking phase.
Native Parser Review
SWC: As the first Rust parser to make its mark, SWC adopts a direct approach by serializing the entire AST for use in JavaScript. It stands out for offering a broad range of APIs, making it a top choice for those seeking Rust-based tooling solutions. Despite some inherent overhead, SWC’s robustness and pioneering status continue to make it a preferred option.
Oxc:: Oxc is a contender for the title of the fastest parser available, but its performance is tempered by serialization and deserialization (serde) overhead. The inclusion of JSON parsing in our benchmarks reflects real-world usage, although omitting this step could significantly boost Oxc’s speed.
Tree-sitter Tree-sitter serves as a versatile parser suitable for a variety of languages, not specifically optimized for TypeScript. Consequently, its performance aligns closely with that of Babel, a JavaScript-focused parser implemented in JavaScript. Alas, a Rust parser is not inherently faster by default, even without any N-API overhead. A general purpose parser in Rust may not beat a carefully hand-crafted parser in JavaScript.
ast-grep
ast-grep is powered by tree-sitter. Its performance is marginally faster than tree-sitter, indicating napi.rs is a faster binding than manual using C++ nan.h. I cannot tell whether the performance gain is from napi or napi.rs but Leveraging the capabilities of tree-sitter, ast-grep achieves slightly better performance, suggesting that napi.rs offers a more efficient binding than traditional C++ nan.h methods. While the exact source of this performance gain—whether from napi or napi.rs—is unclear, the results speak to the effectiveness of the implementation. Or put it in another way, Broooooklyn is 🐐.
Native Parser Performance Tricks
tree-sitter & ast-grep’ Edge
These parsers manage to bypass serde costs post-parsing by returning a Rust object wrapper to Node.js. This strategy, while efficient, can lead to slower AST access in JavaScript as the cost is amortized over the reading phase.
ast-grep’s async advantage:
ast-grep’s performance in concurrent parsing scenarios is largely due to its utilization of multiple libuv threads. By default, the libuv thread pool size is set to four, but there’s potential to enhance performance further by expanding the thread pool size, thus fully leveraging the available CPU cores.
Future Outlook
As we look to the future, several promising avenues could further refine TypeScript parser performance:
Minimizing Serde Overhead: By optimizing serialization and deserialization processes, such as employing Rust object wrappers, we can reduce the performance toll these operations take.
Harnessing Multi-core Capabilities: Effective utilization of multi-core architectures can lead to substantial gains in parsing speeds, transforming the efficiency of our tooling.
Promoting AST Reusability: Facilitating the reuse of Abstract Syntax Trees within JavaScript can diminish the frequency of costly parsing operations.
Shifting Workloads to Rust: The creation of a domain-specific language (DSL) tailored for AST node querying could shift a greater portion of computational work to the Rust side, enhancing overall efficiency.
These potential improvements represent exciting opportunities to push the boundaries of Rust tooling in parsing performance.
Hope this article helps you! We can continue to innovate and deliver even more powerful tools to the developer community!
Using open source software can be a double-edged sword: We enjoy the latest features and innovations, but we hate frequent and sometimes tedious upgrades.
Bevy is a fast and flexible game engine written in Rust. It aims to provide a modern and modular architecture, notably Entity Component System(ECS), that allows developers to craft rich and interactive experiences. However, the shiny new engine is also an evolving project that periodically introduces breaking changes in its API. Bevy’s migration guide is comprehensive, but daunting. It is sometimes overwhelmingly long because it covers many topics and scenarios.
In this article, we will show you how to make migration easier by using some command line tools such as git, cargo and ast-grep. These tools can help you track the changes, search for specific patterns in your code, and automate API migration. Hope you can migrate your Bevy projects with less hassle and more confidence by following our tips.
We will use the utility AI library big-brain, the second most starred Bevy project on GitHub, as an example to illustrate bumping Bevy version from 0.9 to 0.10. Upgrading consists of four big steps: make a clean git branch, updating the dependencies, running fix commands, and fixing failing tests. And here is a list of commands used in the migration.
git: Manage code history, keep code snapshot, and help you revert changes if needed.
cargo check: Quickly check code for errors and warnings without building it.
ast-grep: Search for ASTs in source and automate code rewrite using patterns or expressions.
cargo fmt: Format the rewritten code according to Rust style guidelines.
cargo test: Run tests in the project and report the results to ensure the program still works.
Preparation
Before we start, we need to make sure that we have the following tools installed: Rust, git and ast-grep.
Compared to the other two tools, ast-grep is lesser-known. In short it can do search and replace based on abstract syntax trees. You can install it via cargo or brew.
1
2
3
4
# install the binary `sg`/`ast-grep`
cargo install ast-grep
# or use brew
brew install ast-grep
Clone
The first step is to clone your repository to your local machine. You can use the following command to clone the big-brain project:
Note that the big-brain project is not the official repository of the game, but a fork that has not updated its dependencies yet. We use this fork for illustration purposes only.
Check out a new branch
Next, you need to create a new branch for the migration. This will allow you to keep track of your changes and revert them if something goes wrong. You can use the following command to create and switch to a new branch called upgrade-bevy:
1
git checkout -b upgrade-bevy
Key take away: make sure you have a clean git history and create a new branch for upgrading.
Update Dependency
Now it’s time for us to kick off the real migration! First big step is to update dependencies. It can be a little bit tricker than you think because of transitive dependencies.
Update dependencies
Let’s change the dependency file Cargo.toml. Luckily big-brain has clean dependencies.
[dev-dependencies] -bevy = { version = "0.9.0", default-features = true } +bevy = { version = "0.10.0", default-features = true } rand = { version = "0.8.5", features = ["small_rng"] }
[features]
Update lock-file
After you have updated your dependencies, you need to build a new lock-file that reflects the changes. You can do this by running the following command:
1
cargo check
This will check your code for errors and generate a new Cargo.lock file that contains the exact versions of your dependencies.
Check Cargo.lock, return to step 3 if necessary
You should inspect your Cargo.lock file to make sure that all your dependencies are compatible and use the same version of Bevy. Bevy is more a bazaar than a cathedral. You may install third-party plugins and extensions from the ecosystem besides the core library. This means that some of these crates may not be updated or compatible with the latest version of Bevy or may have different dependencies themselves, causing errors or unexpected behavior in your code. If you find any inconsistencies, you can go back to step 3 and modify your dependencies accordingly. Repeat this process until your Cargo.lock file is clean and consistent.
A tip here is to search bevy 0.9 in the lock file. Cargo.lock will list library with different version numbers.
Fortunately, Bevy is the only dependency in big-brain. So we are good to go now!
Key take away: take advantage of Cargo.lock to find transitive dependencies that need updating.
(Semi-)Automate Migration
cargo check and ast-grep --rewrite
We will use compiler to spot breaking changes and use AST rewrite tool to repeatedly fix these issues. This is a semi-automated process because we need to manually check the results and fix the remaining errors.
The mantra here is to use automation that maximize your productivity. Write codemod that is straightforward to you and fix remaining issues by hand.
CoreSet
The first error is quite easy. The compiler outputs the following error.
1
2
3
4
5
error[E0432]: unresolved import `CoreStage`
   --> src/lib.rs:226:13
    |
226 |         use CoreStage::*;
    |             ^^^^^^^^^ use of undeclared type `CoreStage`
The CoreStage (… more omitted) enums have been replaced with CoreSet (… more omitted). The same scheduling guarantees have been preserved.
So we just need to change the import name. Using ast-grep is trivial here. We need to provide a pattern, -p, for it to search as well as a rewrite string, -r to replace the old API with the new one. The command should be quite self-explanatory.
1
sg -p 'CoreStage' -r CoreSet -i
We suggest to add -i flag for --interactive editing. ast-grep will display the changed code diff and ask your decision to accept or not.
System labels have been renamed to systems sets and unified with stage labels. The StageLabel trait should be replaced by a system set, using the SystemSet trait as dicussed immediately below.
The command:
1
sg -p 'StageLabel' -r SystemSet -i
SystemStage
The next error is much harder. First, the error complains two breaking changes.
1 2 3 4 5
error[E0599]: no method named `add_stage_after` found for mutable reference `&mut bevy::prelude::App` in the current scope --> src/lib.rs:228:13 | ↓↓↓↓↓↓↓↓↓↓↓ use of undeclared type `SystemStage` 228 | app.add_stage_after(First, BigBrainStage::Scorers, SystemStage::parallel()); | ^^^^^^^^^^^^^^^ help: there is a method with a similar name: `add_state`
Let’s see what migration guide said. This time we will give the code example.
1 2 3 4 5 6 7 8 9
// before app.add_stage_after(CoreStage::Update, AfterUpdate, SystemStage::parallel());
// after app.configure_set( AfterUpdate .after(CoreSet::UpdateFlush) .before(CoreSet::PostUpdate), );
add_stage_after is removed and SystemStage is renamed. We should use configure_set and before/after methods.
meta-variable is a wildcard expression that can match any single AST node. So we effectively find all add_stage_after call. We can also use meta-variables in the rewrite string and ast-grep will replace them with the captured AST nodes. ast-grep’s meta-variables are very similar to regular expression’s dot ., except they are not textual.
However, I found some add_stage_afters are not replaced. Nah, ast-grep is quite dumb that it cannot handle the optional comma after the last argument. So I used another query with a trailing comma.
We need to change SystemSet::new().with_system(a).with_system(b) to (a, b). Alas, I don’t know how to write a pattern to fix that. Maybe ast-grep is not strong enough to support this. I just change with_system manually. It is still faster than me scratching my head about how to automate everything.
Another change is to use add_systems instead of add_system_set. This is a simple pattern!
error[E0277]: the trait bound `BigBrainStage: BaseSystemSet` is not satisfied --> src/lib.rs:238:60 | 238 | app.add_system(thinker::thinker_system.in_base_set(BigBrainStage::Thinkers)); | ----------- ^^^^^^^^^^^^^^^^^^^^^^^ the trait `BaseSystemSet` is not implemented for `BigBrainStage` | | | required by a bound introduced by this call | = help: the following other types implement trait `BaseSystemSet`: StartupSet bevy::prelude::CoreSet note: required by a bound in `bevy::prelude::IntoSystemConfig::in_base_set`
Okay, BigBrainStage::Thinkers is not a base set in Bevy, so we should change it to in_set.
Hoooray! Finally the program compiles! ship it Now let’s test it.
Key take away: Automation saves your time! But you don’t have to automate everything.
cargo fmt
Congrats! You have automated code refactoring! But ast-grep’s rewrite can be messy and hard to read. Most code-rewriting tool does not support pretty-print, sadly. A simple solution is to run cargo fmt and make the repository neat and tidy.
1
cargo fmt
A good practice is to run this command every time after a code rewrite.
Key take away: Format code rewrite as much as you want.
Test Our Refactor
cargo test
Let’s use Rust’s standard test command to verify our changes: cargo test.
Oops. we have one test error, not too bad!
1 2 3 4 5 6 7 8 9
running 1 test test steps ... FAILED
failures:
---- steps stdout ---- steps test thread 'steps' panicked at '`"Update"` and `"Cleanup"` have a `before`-`after` relationship (which may be transitive) but share systems.' note: run with `RUST_BACKTRACE=1` environment variable to display a backtrace
Okay, it complains that Update and Cleanup have a conflicting running order. This is probably caused by configure_set.
I should have caught the bug during diff review but I missed that. It is not too late to change it manually.
---- src/lib.rs - (line 127) stdout ---- error[E0599]: no method named `add_system_to_stage` found for mutable reference `&mut bevy::prelude::App` in the current scope
We failed doc-test!
Because our ast based tool does not process comments. Lame. :( We need manually fix them.
Reading a long migration guide is not easy, and fixing compiler errors is even harder.
It would be nice if the official guide can contain some automated command to ease the burden. For example, yew.rs did a great job by providing automation in every release note!
To recap our semi-automated refactoring, this is our four steps:
Keep a clean git branch for upgrading
Update all dependencies in the project and check lock files.
Compile, Rewrite, Verify and Format. Repeat this process until the project compiles.
Run Test and fix the remaining bugs.
I hope this workflow will help you and other programming language developers in the future!
React Server Component is a new React architecture that the React team introduced at the end of 2020, which enables developers to render components on the server side, thereby boosting performance and streamlining code.
However, this innovation, though already more than two years old, still poses some novel challenges and issues, and many React experts are baffled or perplexed by it. I believe it’s not only me how are confused by the heated discussion on Twitter and hours long video explaining the new paradigm. Dan Abramov presented three quizzes about React Server Component, arguably the hottest topic in the React community, to help the audience to understand the new technology better.
This article will analyze the three quizzes that half of the React experts on Twitter didn’t get it right. I hope this can help you understand the RSC better.
TLDR: React will render Client Component as a reference to the script on the server side, and Server Component will be streamed and rendered as a JSON-like UI. The references and JSON will be passed to the browser for coordination and view updates.
the only Client Component out of these is Toggle. It has state (isOn, initially false). It returns <>{isOn ? children : null}</>.
what happens when you setIsOn(true)?
Details gets fetched
Details appears instantly
Second Quiz
Now say isOn is true. You’ve edited the note and told the router to “refresh” the route. This refetches the RSC tree for this route, and your Note server component receives a note prop with latest DB content.
(1) does Toggle state get reset? (2) does Details show fresh content?
(1) yes and (2) yes
(1) yes and (2) no
(1) no and (2) yes
(1) no and (2) no
Third Quiz
Here’s a little twist.
1 2 3 4
<Layout left={<Sidebar />} right={<Content />} />
All are Server components. But now your want to add a bit of state to Layout, like column width, that changes on mouse drag.
Can you make Layout a Client component? If yes, what happens on drag?
I believe some readers who don’t know RSC may be completely confused after reading these three questions and don’t understand what they are asking. So at first, we will briefly introduce what is RSC for those who are new here. If you already know the purpose of RSC, you can skip the section safely.
What is React Server Component?
React Server Component is a special React component that does not run on the browser side, but instead on the server side. So that it can directly access the server’s data and resources, without obtain them through indirection APIs like REST or GraphQL, etc.
React Server Component is a pattern that can help us reduce the number of network requests and the size of data, thereby improving the page loading speed and user experience. React Server Component can also serve dynamic content to users according to different requests and parameters, without having to recompile or deploy.
The purpose of React Server Component is to let developers build applications that span the server and client, combining the rich interactivity of client-side applications and the optimized performance of traditional server rendering. React Server Component can solve some problems that existing technologies cannot solve or solve well, such as:
Zero package size: React Server Component’s code only runs on the server side and will never be downloaded to the client side, so it does not affect the client’s package size and startup time. The client only receives the rendered results of RSC.
Full access to backend: React Server Component can directly access backend data sources, such as databases, file systems or microservices without additional API endpoints.
Automatic code splitting: React Server Component can dynamically choose which client components to render, so that the client only downloads the necessary code.
No client-server waterfall: React Server Component can load data on the server and pass it as props to client components, thus avoiding the client-server waterfall problem.
Avoid abstraction tax: React Server Component can use native JavaScript syntax and features, such as async and await, without having to use specific libraries or frameworks to implement data fetching or rendering logic.
Server Component and Client Component
Before understanding how RSC works, we must first understand two big concepts in RSC, server-side components (Server Component) and client-side components (Client Component).
Server Component
As the name suggests, server components run only once per request on the server, so they have no state and cannot use features that only exist on the client. Specifically:
❌ You cannot use state and side effects, because they (conceptually) run only once per request on the server. So useState(), useReducer(), useEffect() and useLayoutEffect() are not supported. You also cannot use custom hooks that depend on state or side effects.
❌ You cannot use browser-specific APIs, such as DOM (unless you polyfill them on the server).
✅ You can use async/await to access server data sources, such as databases, internal (micro) services, file systems, etc.
✅ You can render other server components, native elements (div, span, etc.) or client components.
Developers can also create some custom hooks or libraries designed for the server. All rules for server components apply. For example, a use case for a server hook is to provide some helper functions for accessing server data sources.
Client Component
Client Component is a standard React component. It obeys all the rules we learnt about React before. The new rules to consider are mainly what they can’t import server components.
❌ Cannot not import server components or call server hooks/libraries, because they only work on the server. However, server components can pass another server component as children to a client component.
❌ Cannot not use server-only data sources.
✅ You can use state and side effects, as well as custom React hooks.
✅ You can use browser APIs.
Here we need to emphasize the nesting of server components and client components. Although client components cannot directly import server components, they can use server components as children. For example, you can write code like <ClientTabBar><ServerTabContent/></ClientTabBar>. From the perspective of the client component, its child component will be a rendered tree, such as the output of ServerTabContent. This means that server and client components can be nested and interleaved at any level. We will explain this design in later quizzes.
How RSC works?
After understanding server components and client components, we can now start to learn how RSC works. RSC rendering is divided into two major phases: initial loading and view updating. There are also two environments for RSC: server and browser. Note that although server components only run on the server, the browser also needs to be aware of them for actual view creation or updating. Client components are similar.
Initial loading
Server
[Framework] The framework’s routing matches the requested URL with a server component, passing route parameters as props to the component. Then it calls React to render the component and its props.
[React] React renders the root server component, and recursively renders any child components that are also server components.
[React] Rendering stops at native components (div, span, etc.) and client components. Native components are streamed in a JSON description of the UI, and client components are streamed in a serialized props plus a reference to the component code.
[Framework] The framework is responsible for streaming the rendered output to the client as React renders each UI unit.
By default React returns a description of the rendered UI, which is a JSON-like data structure, rather than HTML. Using JSON data will allow new data to be more easily reconciled with existing client components. Of course, frameworks can choose to combine server components with “server-side rendering” (SSR) so that the initial render is also streamed as HTML, which will speed up the initial non-interactive display of the page.
On the server, if any server component suspends, React will pause rendering that subtree and send client a placeholder value. When the component is able to continue (unsuspend), React will re-render the component and stream the actual result of the component to the client. You can think of the data being streamed to the browser as JSON, but with slots for suspended components, where the values for those slots are provided as additional items in the response stream later.
Let’s dive into the RSC protocol a little bit by looking at an example of rendering a UI description to help us understand this paragraph. Note this paragraph might not be precise and RSC implementation might change in the future.
Suppose we want to render a div.
1 2 3 4
<div> Hello World <ClientComponent/> </div>
After calling React.createElement, a data structure similar to the following is generated.
The first array represents the output of a Server Component, and you can see that its output is similar to React’s data structure, except that the structure is not an object but an array. The array element $ represents createElement, and the following element {children: xxx} represents props. In children, the first child is directly transmitted with a string. L1 is a placeholder, and the 1 in 1:I below corresponds to it, and 1:I’s data will be filled into L1‘s position.
You might be curious about what does the I mean. In react server component’s protocol, I represents ClientReferenceMetadata, a data structure helping browser to find the correct script entry to the client component. 1:I’s output is a reference to a client component, which contains the script name, chunk name and export name, for the browser runtime (such as webpack) to dynamically import client component code. This structure is the streaming structure mentioned above.
In summary, a Server Component will be rendered into a JSON-like data that represents UI, while client components will be converted into a JSON data that expresses script references.
Browser
[Framework] On the client side, the framework receives the streaming React response and uses React to render it on the page
[React] React deserializes the response and renders native elements and client components.
[React] Once all client components and all server component outputs have been loaded, the final UI state will be displayed to the user. By then all Suspense boundaries have been revealed.
Note that browser rendering is gradual. React does not need to wait for the entire stream to complete before displaying some content. Suspense allows developers to display meaningful loading states while loading client component code and server components are fetching remaining data.
View Updating
Server components also support reloading to see the latest data. Note that developers do not fetch server components individually: one component by one request. The idea is that given some starting server components and props, the entire subtree will be refetched at once. As with initial loading, this typically involves integration with routing and script bundling:
On Browser
[App] When the application changes state or changes routes, it requests the server to refetch the new UI for the changed Server Component.
[Framework] The framework coordinates sending the new route and props to the appropriate API endpoint, requesting the rendering result.
On Server
[Framework] The interface receives the request and matches it with the requested server component. And it calls React to render the component and props, and handles the streaming of the rendering result.
[React] React renders the component to the destination, with different rendering strategies for components and initial loading.
[Framework] The framework is responsible for gradually returning the streaming response data to the client.
On Browser
[Framework] The framework receives the streaming response and triggers a rerender of the route with the new rendering output.
[React] React reconciles the new rendering output with the existing components on the screen. Because the description of UI is data, not HTML, React can merge new props into existing components, preserving important UI state such as focus or input input, or triggering CSS transitions on top of existing content. This is a key reason why server components return UI output as data (“virtual DOM”) rather than HTML.
Summary So Far…
This section is very long, but we can summarize the working principle of RSC in one sentence.
Client Component will be rendered into a script reference, Server Component will be streamed into a JSON-like UI, Server Component with async/await will be replaced by a placeholder first, and then streamed to the browser after resolving.
The table below has more details and principles analysis.
Phase
Platform
ServerComponent
ClientComponent
Initial Load
Server
Run, transformed into JSON UI
Do not run, passed as script reference
Initial Load
Browser
Do not run, mutating dom by JSON UI
Run, resolving script reference and mutating dom
View Update
Browser
Do not run, requesting server for new JSON UI
Run, updating client state
View Update
Server
Run, transformed into new JSON accroding to props and routing
Do not run
View Update
Browser
Do not run, updating dom by new JSON UI
Run, reconciling client state and RSC to dom
Three Quizzes, Three Features
Now let’s see how the above rendering process is applied in the RSC quizzes?
This article will combine these three questions to explain the three major features of RSC: rendering completeness, state consistency, and commutative client/server component.
asyncfunctiongetDetails(note: string) { awaitnewPromise((resolve) =>setTimeout(resolve, 2000)); return`Details for ${note}`; }
In this example, Note and Details are server-side components. Toggle is a client-side component, but its children Details appears directly under the server-side component `Note. So when rendering Note, it will roughly be rendered into
Notice that Details is always rendered on the server side and delivered to the client.
When Toggle is rendered on the client side, Details is not used, but its rendering result is still sent to the client side.
Even though Details is an asynchronous server component that uses async/await, it can still be sent to the front-end after it finishes asynchronously due to the streaming process of React Server Component.
And when the user changes state, the client can directly use the server’s pre-rendered results for dom operations because Details props are the same as those rendered by the server. Therefore, the answer to this question is that Details will appear immediately.
This question reveals the “completeness” of React Server Component: as long as the component appears under the render function of the server-side component, it will be rendered regardless of its usage in client side.
State Consistency
Now assume that isOn is true. You edit the note and tell the router to “refresh” the route. This will re-fetch the RSC tree for this route, and your Note server component will receive a note attribute with the latest database content.
The second question reveals the consistency of the RSC. When the Toggle component changes props on the client side, this change is synchronized between both the server-side component and the client-side component and remains consistent on both ends. <Details note={note} /> When a note changes, React detects the change in the note and sends a request to the server for the new Details rendering data.
Also, the state of the client component Toggle itself is not reset or lost in the browser.
Thus, the design of RSC ensures that the state of the application is consistent across both server and browser.
3. Commutative Client/Server Component
For the third question, let’s expand the question code for context as well.
Let’s rewrite it to a client component that useState. In this example, the width is changed on the client side by changing the input slider. (The implementation detail is inconsequential here).
Note, in this case we can change the Layout from server component to client component without the App component. The only thing changed is how the App is rendered on server side.
As you can see, during serialization, the Layout is transformed from a server-side component to a client-side component. The type field is change from a direct import of Layout component to a module.reference. Meanwhile its child components remain unchanged.
Before we change Layout to client component, the process of rendering Layout happens completely on the server side, and its children are also rendered on the server side. The rendered results are sent to the browser to be transformed into DOM.
After we change Layout to a client component, the process of rendering Layout happens in the browser, but the child components are still rendered on the server side. When the browser renders the server’s JSON UI output, Layout inserts the results of the server-side child components into the browser DOM.
Since the props of the child components are not changed when user changes the layout width on client-side (because they have no props), so the rendering result on the server side does not need to be recaptured.
Therefore, the answer to this question is “it can be converted to a client-side component and the child components will not be recaptured”.
We can rewrite server-side components as client-side components in RSC projects without rewriting component composition at use site. We can call this interchangeability as “commutative” server/client components.
Conclusion
The documentation and RFC for React Server Component is relatively obscure and does not give practical examples, leading many people to wonder what it really is.
In this article, I tried to explain the design ideas and principles of React Server Component by explaining it with Dan’s quizzes. I hope it can help you understand this new feature and become one of the few materials that can let you learn RSC without watching Youtube or following Twitter threads. I hope this will let you understand more about the principle of RSC and the three performance characteristics! Complete Rendering, Consistent State, and Commutative Server/Client Components.
It is not easy to create, if you think this article is helpful to you, please follow me on Medium or treat me a cup of coffee.
This is a rewrite of the zhihu article. Permission has been granted. The original author of this article is finding a job, find him on GitHub.
What’s Type level programming, a.k.a type gymnastics?
TypeScript is a powerful and expressive language that allows you to write complex yet elegant code. Some TypeScript users love to explore the possibilities of the type system and love to encode logic at type level. This practice, as we have a slang for it, is known as type gymnastics. Type gymnastics can help you to perform various tasks such as parsing, validating, transforming, or computing values based on types. Type gymnastics often requires the users mastering a wide range of advanced TypeScript features such as conditional types, recursive types, template literal types, mapped types and more. The community also helps users to learn type gymnastics by creating fun and challenges such as type challenges.
You can proudly call yourself a TypeScript magician if you can solve most of the type challenges!
The type-level programming community has been creating all kinds of amazing tricks ever since the introduction of template literal type in version 4.1. Some enthusiasts have pushed this hobby to the extreme, and even tried to reimplement TypeScript at compile-time using pure types!
However, there are still three major obstacles that prevent TypeScript becoming a true turing complete machine (#14833). They are:
tail recursion count: the maximum number of recursive calls in a conditional type.
type instantiation depth: the maximum depth when we instantiate a generic type alias.
type instantiation count: the maximum number of type instantiations.
These limits are not arbitrary. The compiler has set a maximum limit for these three values and will throw an error TS2589 if we exceed them to prevent the compiler from hanging or crashing. They are the walls that stop us from breaking through the limits of TypeScript compiler. But, there is actually a hidden layer behind the wall, if we explore the compiler source code carefully.
Doing type level programming is like casting magic, but breaking through the wall of type gymnastics is like finding the hidden chamber of secrets that contains the most powerful and dangerous type of all.
Some digression for background…
Back then three years ago, I wrote an article about how to implement a recursive descent parser. At that time, there was no template literal type, and a lot of type system limitations have been lifted since then. Crafting a code interpreter using recursive descent parsing would easily exceed the compiler’s limit.
So I decided to switch to a bottom-up parsing method to more easily bypass the limit, with some tricks :). Later, as TypeScript gradually evolves, newly added features opened unprecedented possibilities of type gymnastics. This finally gave me a chance to implement a type gymnastics parser generator for LALR(1) grammar to generate a parser for a subset of JavaScript syntax. I designed a special purpose “bytecode” for the ease of type level execution and directly compiled the input code into the bytecode during the parsing process(I still have some unfinished work left, procrastinating now…). My ultimate goal is to implement a type level scripting language that can execute sufficiently complex code.
To achieve this goal, I need to solve all the three limitations mentioned above to run lunatic code patterns, to some extent, at compile time!
Tail Recursion Count
Let’s look at the first limitation, the type tail recursion count (tailCount). Type level programming often uses recursive types. Before the previous versions supported recursive types, we usually implemented recursion by combining mapped types, recursive type definitions and index types. Ever since we had recursive types and tail recursion of type instantiation, this kind of type gymnastics became much more elegant, but at the same time we also got this tail recursion count limitation.
Searching for tailCount in the TypeScript source code, we can see that the implementation is related to computing conditional types. Let’s simplify the code a bit and take a look (sorry folks, I cannot get a link to GitHub source code due to checker.ts is too large):
// transitively used in instantiateType functiongetConditionalType(root: ConditionalRoot) { let result; let tailCount = 0;
while (true) { if (tailCount === 1000) { error(2589); result = errorType; break; } // false branch if (!isTypeAssignableTo(checkType, extendsType)) { const falseType = getTypeFromTypeNode(root.node.falseType);
if (canTailRecurse(falseType)) { // root = falseType; continue; } // tail call terminates, creating new type result = instantiateType(falseType); break; } // true branch if (isTypeAssignableTo(checkType, extendsType)) { const trueType = getTypeFromTypeNode(root.node.trueType);
if (canTailRecurse(trueType)) { // root = trueType; continue; } // end of tail recursion, instantiate new type result = instantiateType(trueType); break; } } return result;
if (newRoot.aliasSymbol) { tailCount++; } returntrue; } } } }
We can see that as long as the branch of the conditional type that matches is another conditional type, and the new conditional type is neither a distributive conditional type nor a union type or never, then the new conditional type will be substituted into the next round of computation.
The only problem is that it will trigger an error TS2589 when the loop reaches 1000 times, TS Playground:
To avoid reaching the 1000 times recursion limit, we can deliberately break the tail recursion after a certain number of recursions (using an extra parameter to count), as long as we return a type that does not satisfy the above conditions, and does not affect the result of the type we return, such as returning an intersection type (Playground Link):
typeZeroFill< Outputextends0[], Countextendsnumber, IterationsextendsIncr[number] = 0 > = Iterationsextends100 ? // Change the recursive type to an intersection type, break the tail recursion and reset the iteration ZeroFill<Output, Count, 0> & {} : // Recursion terminates Output["length"] extendsCount ? // Final Result Output : // Increment the count for each recursion ZeroFill<[...Output, 0], Count, Incr[Iterations]>;
typeSized3K = ZeroFill<[], 3000>; // Okay. typeSized4K = ZeroFill<[], 4000>; // Okay, but this is not the end of story...
Type Instantiation Depth
The type above has now exceeded the limit of 1000 recursions, but if you comment out Sized3K, you will see that Sized4K will trigger TS2589. This is related to the second limitation, which is the type instantiation depth (instantiationDepth). The reason why commenting out has an effect is because TypeScript will cache all instantiated types, which we will discuss later. Again, we can search for instantiationDepth in the TS source code. You can see that it is implemented with all types that have type mapping. There are several kinds of type mapping. For example, types that use generic parameters will have type mapping to map parameters to actual types. The relevant code is simplified as follows:
We also see the instantiationCount mentioned at the beginning, but we will first focus on the instantiationDepth for now. We can see that before and after each type alias instantiation, the instantiation depth will increase and decrease, and any call to instantiateType in the middle process will indirectly call the above type, which will make the depth count continue to increase. To avoid reaching the maximum depth, one is to use tail recursion as much as possible, and the other is to reduce the dependence on intermediate types in the recursive process if you use the technique of breaking tail recursion before. Here is an example code (to reduce interference we simplify it to only have two generic parameters, only keep the recursive logic itself, and use intersection type to prevent tail recursion instantiation):
// Simulate a type that keeps calculating values and sets the finish state based on the results typeBadWay<State, Value> = Stateextends`finish` ? Value : // Use conditional type and infer type to save the new result Calculate<Value> extends infer NewValue ? // Use conditional type and infer type to save the new state CheckValue<NewValue> extends infer NewState ? // Compared to direct recursion, this adds two levels of type instantiation depth BadWay<NewState, NewValue> : never : never;
// In fact, repeating “calling” type aliases does not lose anything, TS will always cache all types instances. typeGoodWay<State, Value> = Stateextends`finish` ? Value : // Direct recursion reduces the instantiation depth as much as possible GoodWay< // The intermediate result is instantiated when passing parameters, which can be instantiated before recursion, releasing the increased depth. CheckValue<Calculate<Value>>, // The repeated alias calls will only be truly instantiated once due to the caching mechanism, so you don’t have to worry about various restrictions and overheads. Calculate<Value> > & {};
In the example above, BadWay increases the depth by two levels more than GoodWay for each recursion, which will reach the recursion depth limit faster.
With the instantiation level limit, we should start recursion as early as possible, putting all kinds of intermediate type calculations into parameters. And let each iteration type complete instantiation as soon as possible, releasing the increased depth.
Another way to release the depth count in advance is to manually split the iteration process into multiple parts, storing intermediate result as a type alias. Let’s take the first type as an example:
One thing to keep in mind is that as the type becomes more complex, the tsc compiler may handle it fine, but the editor may not give any feedback due to the long response time. This is because they use different methods and caches for type checking. For example, in the code above, if we comment out Sized4K (which has a cache effect), and directly generate Sized5K from Sized3K, we will get a TS2589 error again. See the playground link.This is not caused by the two limitations we mentioned before, because this time we only have 2000 iterations, much less than Sized3K. The actual cause of this compilation error leads us to the third limitation: the type instantiation count (instantiationCount).
Type Instantiation Count
We have encountered the variable instantiationCount before in the function instantiateTypeWithAlias. It has a current limit of 5,000,000, which is incremented together with instantiationDepth every time a type is instantiated. Unlike instantiationDepth, it does not decrease when the instantiation is done because it represents the number of type instances that are created in one instantiation process. If we continue to search the source code, we can see that it is set to 0 when the compiler checks some types of syntax nodes:
If we debug tsc and set a breakpoint after the condition instantiationCount >= 5000000, we will see in the call stack that the error is thrown when instantiating an object type with more than 3700 members. This object type is actually the array type that we generated. We will not analyze step by step why it produces so many (5 million) type instances here. We just need to know that this array is created by many generic parameters, which leads to a large number of type instances. Even if our type gymnastics did not generate such a large array, it would slow down the speed when producing so many type instances. So how can we avoid this situation?
The direct conclusion is to use other types to achieve the purpose according to the needs. For example, if you use an array type to simulate a stack structure, and only need to access the last one or a few elements, then you can define a List object type, which is concatenated, but the structure of the object is fixed:
1 2 3 4 5 6 7 8 9 10 11
typeList<T> = { data: T; prev: List<T> };
typeAppend<P extendsList<unknown>, T> = { data: T; prev: P };
typePopped = Stackextends`${string},${infer S}` ? S : never;
typeLast = Stackextends`${infer T},${string}` ? T : never;
You can even use union types. However, you need to pay attention that when union types are used in distributive conditional types, they will generate the same number of type instances as the number of elements, but they are still a better choice in many cases.
Usual type level programming will not trigger this limitation, so we will not describe it too much. To optimize the number of instantiations, you inevitably need to read the compiler source code, or you can add the --diagnostics parameter when calling tsc, and observe the Instantiations in the output, which can show how many type instances are generated in total.
Conclusion
One caveat is that all tricks in the article are probably the byproduct of a specific compiler implementation and are not officially supported by the TypeScript team. And they may even be broken in the future! Actually, most of these dark magics are manipulating type instantiation to make time-space trade-offs. We are nudging compiler to forget intermediate type caches (Obliviate!), prompting it to compute more types (Imperio!) and forcing it to work longer for a compilation (Incarcerous!). All the grueling rituals for the holy grail of turing completeness!
However, they are still very useful in some cases and help us break the limitations of TypeScript! The snake is in the chamber of secrets, so use these lost spells wisely, my great mage!
If you find this article useful, I would be more than happy if you can treat me some coffee.
Translation, rewrite and title image generation are all assisted by MicroSoft Bing Chat.
In this post I will discuss how to optimize the Rust CLI tool ast-grep to become 10 times faster.
Rust itself usually runs fast enough, but it is not a silver bullet to all performance issues.
In this case, I did not pay enough attention to runtime details or opted for naive implementation for a quick prototype. And these inadvertent mistakes and deliberate slacking off became ast-grep’s bottleneck.
Conceptually, ast-grep takes a piece of pattern code (think it like a regular expression but for AST), matches the pattern against your codebase and gives a list of matched AST nodes back to you. See the playground for a live demo.
I designed ast-grpe’s architecture with performance in mind. Here are a few performance related highlights:
it is written in Rust, a native language compiled to machine code.
Optimizing the program is a matter of finding the hotspots in the flamegraph and fix them.
For a more intuitive feeling about performance, I used the old command time to measure the wall time to run the command. The result is not good.
1 2
time sg scan -c eslint/sgconfig.yml TypeScript/src 17.63s user, 0.46s system, 167% cpu, 10.823 total
The time before user is the actual CPU time spent on my program. The time before total represents the wall time. The ratio between them is the CPU utilization. In this case, it is 167%. It means my program is not fully utilizing the CPU.
It only runs six rules against the codebase and it costs about 10 whole seconds!
In contrast, running one ast-grep pattern agasint the TypeScript source only costs 0.5 second and the CPU utilization is decent.
1
2
3
time sg run -p '$A && $A()' TypeScript/src --json > /dev/null
1.96s user, 0.11s system, 329% cpu, 0.628 total
Expensive Regex Cloning
The first thing I noticed is that the regex::Regex type is cloned a lot. I do know it is expensive to compile a regex, but I did not expect cloning one will be the bottleneck. Much to my limited understanding, dropping Regex is also expensive!
Fortunately the fix is simple: I can use a reference to the regex instead of cloning it.
This optimzation alone shaves about 50% of execution time.
1
2
time sg scan -c eslint/sgconfig.yml TypeScript/src --json > /dev/null
13.89s user, 0.74s system, 274% cpu 5.320 total
The new flamegraph looks like this.
Matching Rule can be Avoided
The second thing I noticed is that the match_node function is called a lot. It is the function that matches a pattern against an AST node. ast-grep can match an AST node by rules, and those rules can be composed together into more complex rules. For example, the rule any: [rule1, rule2] is a composite rule that consists of two sub-rules and the composite rule matches a node when either one of the sub-rules matches the node. This can be expensive since multiple rules must be tried for every node to see if they actually make a match.
I have already forsee it so every rule in ast-grep has an optimzation called potential_kinds. AST node in tree-sitter has its own type encoded in a unsigned number called kind. If a rule can only match nodes with specific kinds, then we can avoid calling match_node for nodes if its kind is not in the potential_kinds set. I used a BitSet to encode the set of potential kinds. Naturally the potential_kinds of composite rules can be constructed by merging the potential_kinds of its sub-rules, according to their logic nature. For example, any‘s potential_kinds is the union of its sub-rules’ potential_kinds, and all‘s potential_kinds is the intersection of its sub-rules’ potential_kinds.
Using this optimization, I can avoid calling match_node for nodes that can never match a rule. This optimization shaves another 40% of execution time!
Finally, the function call ts_tree_cursor_child_iterator_next caught my eyes. It meant that a lot of time was spent on traversing the AST tree.
Well, I dumbly iterating through all the six rules and matching the whole AST tree for each rule. This is a lot of duplicated work!
So I used a data structure to combine these rules, according to their potential_kinds. When I’m traversing the AST tree, I will first retrieve the rules with potential_kinds containing the kind of the current node. Then I will only run these rules against the node. And nodes without any potential_kinds hit will be naturally skipped during the traversal.
This is a huge optimization! The ending result is less than 1 second! And the CPU utilization is pretty good.